Bugfender Android SDK - Kotlin
An Android Sample app is available at Github Bugfender Android
![]()
![]()
![]()
![]()
Bugfender is a game-changing platform that logs every detail your users experience and feeds the data directly to an easy-to-use web console. Bugfender SDK is multi-platform and available for mobile and web apps, so you can use the same tool for all your apps.
Specifically for Android developers, Bugfender offers powerful capabilities to remotely monitor and debug any log or error. You can easily reproduce and fix issues using our detailed log viewer and the stack trace of exceptions.
If you don't have a Bugfender account yet, go to Bugfender Signup and come back here.
Learn How To Install Bugfender Android SDK in 10'
Watch this simple tutorial and learn how to receive the logs and crashes form your Android users.
Install
Using Kotlin for Gradle (build.gradle.kts)
Find your module <module>/build.gradle.kts (usually called Module: app) and add under dependencies:
implementation ("com.bugfender.sdk:android:4.+")
Using Groovy (build.gradle)
Find your module <module>/build.gradle (usually called Module: app) and add under dependencies:
implementation 'com.bugfender.sdk:android:4.+'
Configure
If you do not have one yet, create an Application class. For that, go to File > New > Kotlin File/Class, call it App and paste the following code:
package your.pkg.name

import android.app.Application

class App : Application() {
  override fun onCreate() {
    super.onCreate()
  }
}
Then add the class name by editing AndroidManifest.xml and adding the name attribute to <application> tag, should look like this:
<application
  android:name=".App"
  android:allowBackup="true"
  android:icon="@mipmap/ic_launcher"
  android:label="@string/app_name"
  android:supportsRtl="true"
  android:theme="@style/AppTheme">
  ...
</application>
Add the lines in bold to your Application class:
package your.pkg.name

import android.app.Application
import com.bugfender.sdk.Bugfender

class App : Application() {
  override fun onCreate() {
    super.onCreate()

    //Next two lines are usually not required
    //But in case you have on-premises or custom data centers, you might need to set your URLs
    //Bugfender.setApiURL(URL(string: "https://api.bugfender.com/")!)
    //Bugfender.setBaseURL(URL(string: "https://dashboard.bugfender.com")!)

    Bugfender.init(this, "YOUR_APP_KEY", BuildConfig.DEBUG)
    Bugfender.setNetworkLoggingEnabled(true) // optional, capture network requests
    Bugfender.enableCrashReporting()
    Bugfender.enableUIEventLogging(this)
    Bugfender.enableLogcatLogging() // optional, if you want logs automatically collected from logcat
  }
}
Remember to change YOUR_APP_KEY with the app key of your app. You can get an app key by signing up to Bugfender.
Usage
Send logs Using logcat
Bugfender can collect logs automatically from logcat. For that, you just have to call:
Bugfender.enableLogcatLogging()
We recommend this as a quick way to get started with Bugfender. However, if you’d like more control on the logs you send to Bugfender, you can remove that line.
Logcat logging has a few drawbacks:
- There are some system-generated logs that you might not necessarily want to capture. You can filter those messages if you want, by providing a callback.
- The system logging daemon might crash. This is a known issue with some Samsung phones when lots of logs are being written in a short amount of time.
- The system logging daemon might be disabled. This is a known issue with some old models of Huawei phones.
- The system might decide to kill the process that the SDK needs to collect the logs if low on memory. This is a known issue with some Wear models.
Sending logs directly to Bugfender
If you want, you send logs directly to Bugfender, regardless if you capture logs from logcat or not. To do that, call Bugfender as if it were the Android Logger class:
Bugfender.f("TAG", "Fatal log")
Bugfender.e("TAG", "Error log")
Bugfender.w("TAG", "Warning log")
Bugfender.d("TAG", "Debug log")
Bugfender.i("TAG", "Info log")
Bugfender.t("TAG", "Trace log")
We also have support for several logging libraries:
Device associated data
Once your application is running on several devices, it will be useful to know which device belongs to whom. You can associate information to a device as if it were a dictionary:
Bugfender.setDeviceString("user email", "john.smith@example.com")
Bugfender.setDeviceInteger("user.photo.image.width", 600);
Bugfender.setDeviceBoolean("user.is.logged", true);
Bugfender.setDeviceFloat("user.children", 3f);
This will later on let you search this device by “key” in the Bugfender Dashboard and you can use any of the associated data to filter our your device list.
If you want to remove a specific value associated with the device, you can do it with:
Bugfender.removeDeviceKey("user.children");
Send issues
Bugfender allows you to send issues to the server. An issue is similar to a session but they are showed in the issues section and you can send issues any time from the app, even if the device is not enabled in the system. Issues are useful to keep track of important errors that you can detect in your code.
For sending an issue you can use the following function:
Bugfender.sendIssue("Title", "Detail")
Collect user feedback
Getting feedback from the final users is one of the most important things for an app developer. Good user feedback allows you detect errors in your app and helps you to understand better your product.
Bugfender provides a feature to easily collect app feedback from final users. It takes only two minutes and a few lines of code to integrate. You can think about the User Feedback as a special kind of Issue, every time your users submit their feedback you will get a new issue in Bugfender.
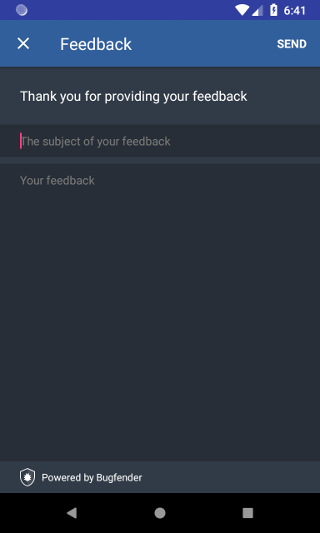
The easiest way to implement Bugfender User Feedback is using the customizable User Feedback Activity. It provides a convenient screen with two text fields, one short for the subject and another bigger for the feedback.
Using the default UI
Using the convenient UI provided by Bugfender requires only creating a new View Controller and presenting it modally. All you need is to call the following method and complete the required parameters with the title and placeholders for your UI.
// Obtaining the Intent
Intent userFeedbackIntent = Bugfender.getUserFeedbackActivityIntent (
                                                        context,
                                                        "App bar title",
                                                        "Give some instructions to your users",
                                                        "Placeholder for subject textfield" ,
                                                        "Placeholder for message textfield",
                                                        "Send")


// Starting the Activity
startActivityForResult (userFeedbackIntent, YOUR_REQUEST_CODE);
You can obtain information about the user action (if feedback was sent and the URL on Bugfender dashboard) using the onActivityResult method:
override fun onActivityResult(requestCode: Int, resultCode: Int, data: Intent?) {
  super.onActivityResult(requestCode, resultCode, data)
  if (requestCode == FEEDBACK_REQUEST_CODE) {
    Toast.makeText (this, if(resultCode == Activity.RESULT_OK) "Feedback sent" else "Feedback cancelled", Toast.LENGTH_SHORT).show ()
  } else {
    super.onActivityResult (requestCode, resultCode, data)
  }
}
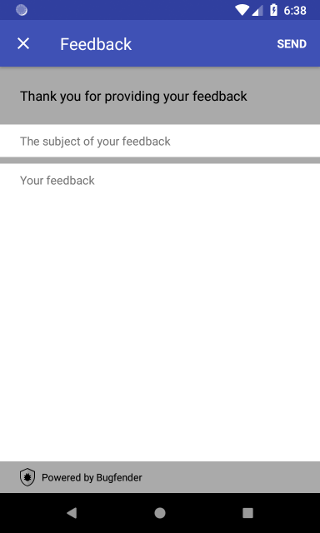
Additionally, if you require more customization you can configure the colors of the screen calling a version of Bugfender.getUserFeedbackActivityIntent method that accepts a FeedbackStyle object as an additional argument. With this object you can configure three areas of the screen separately (app bar, input and rest of the screen), the areas that are not set will use the colors provided by our default implementation.
FeedbackStyle feedbackStyle = new FeedbackStyle ()
    .setAppBarColors (R.color.backgroundColor, R.color.titleColor, R.color.closeButtonColor, R.color.actionButtonColor)
    .setInputColors (R.color.backgroundColor, R.color.textColor, R.color.hintColor)
    .setScreenColors (R.color.backgroundColor, R.color.textColor)
Using a custom UI
If you need further customization you can implement your own UI. All you have to do is collect your user feedback as you wish and send it to Bugfender using Bugfender.sendUserFeedback:
Bugfender.sendUserFeedback ("Title of the feedback", "Message of the feedback")
Advanced Usage
Network logging (Currently in Beta, contact support to activate)
Bugfender can capture app network traffic (OkHttp and Ktor) and send it to Device Logs as entries tagged bf_network.
When network logging is enabled, Bugfender also injects correlation headers in requests:
X-Bugfender-Session-IDX-Bugfender-Request-ID
Enable network capture
Bugfender.setNetworkLoggingEnabled(true)
Wire your HTTP client
If you use the Bugfender Android instrumentation plugin, OkHttp wiring is automatic. If you wire manually, add the adapter dependency and attach the interceptor:
dependencies {
    implementation("com.bugfender.sdk:android-okhttp:4.+")
}
import com.bugfender.sdk.BugfenderOkHttpEventListenerFactory
import com.bugfender.sdk.BugfenderOkHttpInterceptor
import okhttp3.OkHttpClient

val client = OkHttpClient.Builder()
    .addInterceptor(BugfenderOkHttpInterceptor())
    .eventListenerFactory(BugfenderOkHttpEventListenerFactory())
    .build()
If you use Ktor, install the Bugfender Ktor plugin in each HttpClient:
dependencies {
    implementation("com.bugfender.sdk:android-ktor:4.+")
}
import com.bugfender.sdk.BugfenderKtorPlugin
import io.ktor.client.HttpClient
import io.ktor.client.engine.cio.CIO

val client = HttpClient(CIO) {
    install(BugfenderKtorPlugin)
}
Configure capture level, filters and limits
// Full mode: capture headers and bodies
Bugfender.setNetworkLoggingCaptureBodies(true)

// Capture response bodies only for failed responses (status >= 400)
Bugfender.setNetworkLoggingCaptureErrorResponseBodies(true)

// URL filters (supports plain substring and wildcard patterns like https://*.example.com/*)
Bugfender.setNetworkLoggingURLFilter(
    listOf("api.example.com"),         // allowlist
    listOf("api.example.com/private")  // denylist
)

// Requests captured per calendar minute (null disables limit)
Bugfender.setNetworkLoggingMaxRequestsPerMinute(60)
Obfuscate sensitive data
import com.bugfender.sdk.NetworkRequestData
import com.bugfender.sdk.NetworkResponseData

Bugfender.setNetworkLoggingRequestObfuscationHandler { url, headers, body ->
    val safeHeaders = headers.toMutableMap().apply {
        if (containsKey("Authorization")) {
            this["Authorization"] = "***"
        }
    }
    NetworkRequestData(url, safeHeaders, body)
}

Bugfender.setNetworkLoggingResponseObfuscationHandler { headers, body ->
    val safeHeaders = headers.toMutableMap().apply {
        if (containsKey("Set-Cookie")) {
            this["Set-Cookie"] = "***"
        }
    }
    NetworkResponseData(safeHeaders, body)
}
Customizing logcat collection
As we have mentioned earlier, Bugfender can automatically read logs from logcat, so you don't have to change anything in your application to start using Bugfender right away. It happens, however, that not only your logs will be fetched, but also some system generated logs belonging to your application will appear.
When you initialize Bugfender, this log line enables this behavior:
Bugfender.enableLogcatLogging();
If you would like to filter the logs from logcat, you can add a callback function to enableLogcatLogging() like this:
Bugfender.enableLogcatLogging(object : LogcatInterceptor {
    override fun intercept(interceptedLog: InterceptedLog): InterceptedLog? {
        // Block Levels higher than Warning
        if (interceptedLog.level.ordinal > LogLevel.Warning.ordinal) {
            return null
        }

        // Modify the rest of the logs
        interceptedLog.message = interceptedLog.message + " - Modified on SampleApp.kt"

        return interceptedLog
    }
})
Having your app decide when to send logs
In some special circumstances you may want to send logs, regardless of the enabled state of the device in the Bugfender console, for example in a custom exception handler. Use forceSendOnce to force sending the logs once, and use setForceEnabled to force it for some period of time.
//Force to send the logs once
Bugfender.forceSendOnce();

//Force to send the logs from now on
Bugfender.setForceEnabled(true);
Manually sending crashes in Android
If you have your own crash reporting system and need to send crashes, you can do so by calling directly sendCrash
Bugfender.sendCrash("Crash title", "Stacktrace")
Get Session Link
Sometimes you want to integrate Bugfender with a third party tool. For this purpose, the SDK provides a method that returns the URL for the session. You can send it to the third party tool to easily go to the logs of the current session from the other tool.
Bugfender.getSessionUrl();
Get Device Link
Sometimes you want to integrate Bugfender with a third party tool. For this purpose, the SDK provides a method that returns the URL for the current device. You can send it to the third party tool and easily navigate back to the logs of the device from the other tool.
Bugfender.getDeviceUrl();
Log buffer size
Bugfender keeps up to 5 MB worth of log data in the device. This way Bugfender can work offline, and you can get some log data from the past when enabling a device. You can change that limit with setMaximumLocalStorageSize.
// Setting maximum cache size to 1 Mb
Bugfender.setMaximumLocalStorageSize(1024*1024)
Automate Symbols Uploading
You can use the Bugfender Gradle Plugin to automatically upload ProGuard mapping for deobfuscating crashes.
Using Kotlin for Gradle (build.gradle.kts)
Find your module <module>/build.gradle.kts (usually called Module: app) and add the following (first two lines of plugins should be there already):
plugins {
    id("com.android.application")
    id("org.jetbrains.kotlin.android")
    id("com.bugfender.upload-mapping") version "1.1.2"
}

bugfender {
    symbolicationToken("YOUR_SYMBOLICATION_TOKEN")
}
Using Groovy (build.gradle)
Add the following to your app build.gradle:
plugins {
  id "com.bugfender.upload-mapping" version "1.1.1"
}

bugfender {
  symbolicationToken "YOUR_SYMBOLICATION_TOKEN"
}
Note: The plugin requires com.android.tools.build:gradle in version at least 4.1 to work properly.
API Reference
For a complete API Reference you can visit: https://javadoc.io/doc/com.bugfender.sdk/android/latest/index.html